Monday, December 20, 2010

Curved Stair Nosings Installed and Finished

Well the church is finished just in time for Christmas service.  Below are a few pictures of the wood step nosings installed just prior to project completion:

Tuesday, November 16, 2010

Curved Stage Nosings

I've been working on building a new church in my work life for the past year.  We are closing in on completion now.  The stage has a thin hardwood flooring and is shaped in a semi circle.  The semi circle has a radius of 8'-2" that terminates into a 1-1/2" thick nosing to the lower floor.  The radius nosing had to be custom built for this application and I thought it would be fun to do in my shop.
Glue ups of double 3/4" for 1-1/2" thick nosing

 
Template for three radii


Nosing rough cut with band saw ready for smooth cut with router and template

Nosing inside (third) radius template


Routed inside radii, ready for outside radius

Shop Vac Redemption

Feeling more than a little foolish about the trash bag in the shop vac, I took another shot at the concept.  I imagined that if I had a bag with a little more [m]ass, the suction would not pull the sides into the filter so easily.  I though about just adding some ballast to the bag, but this seemed a little like admitting defeat.  When working on a new foot stool for my niece, I remembered that I had replaced the filter-bag on my dust collector with a less permeable one.  I had kept the original bag and it fit nice and snug into the shop vac canister.  I added a pair of my daughters tights to the filter for extra filter life and the system does work well after much more extensive testing.  So, I can now recommend this approach.

Monday, November 1, 2010

Shop Vac Redoux

Update:  Plastic bag in shop vac = bad idea.  I don't know what I was thinking--I knew that the plastic bag would get sucked around the filter and cause the vac to have no suction--similar to the water intake on an outdrive.  I have a heavy canvas bag that will fit into the canister--going to try that.  Maybe an internally expanding ring of some sort to keep the bag away from the filter, hmmm.....Maybe an MDF disk cut the ID of the canister that stays in the bag...

Monday, October 25, 2010

Shop Vac

While I was working on a project this weekend (curved oak stair nosings for a church I am building--more on that later), I was forced to perform a most dreaded shop chore--emptying the shop vac.  There are many problems with shop vacs, some of which can be improved, some, one must live with.  I use two vacs in the shop: one dedicated to the miter saw for dust collection powered through a triggered switch that powers up when I start the saw and runs a few seconds after I release the saw trigger.  This vac is buried behind the saw stand and thankfully doesn't require emptying often due to its exclusivity.  My other vac gets used for dust collection on the router table and also for general shop cleanup, so it sees much more use.  I have my router table wired with a 30 AMP switch that activates the internal outlet that the router is plugged into and an external outlet that the vac is plugged into so that they come on simultaneously, like the miter saw.


The multi-use vac is mounted on a light duty convertible dolly, the type that looks handy when one acquires it, but ultimately is of little use.  I am lucky enough to have received two of these dollies from individuals who became tired of looking at them.  One is dedicated to my recycling totes and the other has become the bottom half of my shop vac.

You might be thinking "hey, most shop vacs come with wheels".  If you are really thinking, you would finish that thought with "that aren't worth a damn".  If the wheels aren't yet broken, they are the perfect size for tripping over any object that you would find on the ground at any given time, including the vac's own cord.  This usually results in a tipped over vac or a dislocated hose, or both, and at the moment you are experienced the most weakened good humor.  The dolly's large rear wheels and good pivoting ability greatly reduce both hazards.

But, in order to keep the vac on the dolly, I have bungied it front and rear.  This adds another step to the already irritating process of emptying the thing.  This process begins when you realize that you have no more suction.  You take off the top and dust floats gently into your nostrils.  You unscrew the filter retainer and pull the filter off its stanchion, causing another cloud.  Then you must knock the caked dust off the filter into the vac, which is a major mess, so you leave the filter in the vac and drag the whole unit to your dumping point, which is for me, the woods  (shut up, I'm composting).  On the way, the many useless attachments that are handily mounted onto the vac fall off, leaving a trail.  In my particular case, the man-door to the back yard is partially blocked to accommodate my storage needs.  It opens enough for a man to pass through, but not a man with a clump of shop vac.  This means I must go around through the overhead door to the back, which is blocked by a nifty stone wall, effectively making the trip one for which you may want to pack a lunch.

Yesterday, I had an epiphany.  After a particularly rigorous encounter with a too long neglected vac, it occurred to me that I could simply put a plastic garbage bag in the vac so that emptying it is a matter of lifting out the bag, which can then go into a garbage can, or fit through the back door with me to be emptied in the compost heap without disconnecting and wrestling with the entire apparatus.

Life is full of simple pleasures.

Thursday, October 21, 2010

The Pook Age 0 to 4

Several years ago I was noodling around with a few gadgets I acquired over the years and ended up with a few musical compositions.  Using a BOSS 8 track digital recorder and a Yamaha digital sequencer, I dubbed in a few guitar chords and some melody lines using various guitars.  These recordings were one take spontaneous experiments--no actual composing was done; I simply laid in a basic sequence or chord progression, then a melody track.

This particular track was pretty organic.  Although I lined-in an acoustic/electric Taylor 714CE in order to get a bit of chorus for the chord progression, I mic'd the melody line using a condenser mic with a little delay effect in the mixer.  I played the melody with a Taylor NS something or other--a nylon stringed classical guitar (which is my favorite because it doesn't hurt my hands to play big chords--I have some sort of affliction in my left hand that has always made it hard to hold the necessary pressure on bar chords--no matter how much I have played over the years, I have never gotten past that--big impediment that the classical set up eases tremendously due to less string tension).  The fancy equipment has all the necessary gadgetry to mix a much better recording, but requires more than an hour or so at a time to learn how to use and I have yet to invest the effort.  Some day.  In the meantime, raw is what I get.

The kids were not yet born when I made the recordings, so there is no connection.  Honestly, I have simply been trying to figure out how to post audio to this site and the only way I have found so far is to create a video.  Shows you how the world is changing, eh?  In the high school garage band days, our state of the art recordings were direct to one track cassette through a "boom box" with built in mic.  Heady days.  Its just as well, though--better technology would not have served our style and abilities.

Monday, October 18, 2010

The Rock-Preamble

Many years ago, I'm not sure how many, my uncle (the one who has the country place that no one knows about) set about the daunting task of building a major earth dam across a huge ravine that had been carved out over many decades of watershed.  By design, this dam created a pretty little pond that is spring fed and full of blue gills who think they are piranha.  In the process of creating this little Walden, a very large flat limestone rock was unearthed.  By large, I mean 12' square, roughly, by about 12" thick, more or less.  As the legend goes, a very large dozer puffed mightily as it pushed this leviathan up from the depths of the hole.  The operator shoved it up next to an old tree (I really should know what kind of tree, but I cant recall), and there it sat for several years.  The pond filled quickly, we sowed some grass, and today it looks as if it was always there.

But the rock taunted me, laying there year after year, looking quite out of place and useless.  Many beers were drunk while imagining a use for this rock.  It is not particularly striking in any way except in its size.  Certainly not the type of rock one would buy to add to the landscape of his home.  It really only has one quality: persistence in its vocation (that of being a big rock).    But I could not be in its vicinity without it catching the corner of my eye, laying there all smug.  It did not belong there.  It knew it. We all knew it.  And year after year it dared us to do something about it.

The problem one has with monoliths is Newtonian in nature.  The whole mass at rest thing is problematic proportionate to the mass.  This is compounded by economic principles that dictate that the relative value of a relocated rock times the expenditures of moving it equals folly.  Consequently, using a crane or enormous track-hoe was out of the question.  Still, it beckoned.  There is something very basic in the nature of man that compels us to dash ourselves against rocks.  History has no shortage of examples.  And so over many years of careful inebriation we finally came to the only possible conclusion:  the rock must become a picnic table.  And to be certain we properly honored our ancestors, it must become a picnic table 30 feet to the right.


We decided to get Egyptian on its ass.

To be continued...

Wednesday, September 15, 2010

Shootout/Pig Roast

Well, its been a busy summer.  While the economy executed the innocent, those of us still on the chain gang found ourselves redefining  "do more with less".  Consequently, I have not taken the time to enter any updates.  In brief, I have been working on finishing the basement, finishing Yoda (more about those projects later), and most recently, preparing for last weekend's annual Shootout, which was expanded to include a pig roast for the first time this year.
"My uncle has a country place that no one knows about.  He says it used to be a farm, before the Motor Law..."  --Red Barchetta, Rush
There is a little scrap of land in Indiana that my grandfather owned, which his youngest son now owns, that has always been used as a sort of retreat into the country.  My uncle has transformed it, for the better, from my earliest memories, but it retains its purpose.  Annually, the uncles and male cousins get together for a target shooting competition, which also has evolved over the years, most recently to include trap shooting.  This event always takes place the weekend after Labor Day weekend, which coincidentally collides with the anniversary of the 9/11 tragedy, my mother's birthday, my brother's wife's birthday, their anniversary, and my uncle and his wife's anniversary.  Not that any of that matters.  The annual date was based on a weightier matter: the end of the boating season.

This year, I was planning to have Yoda finished so I could return it to my cousin at the shootout, as a matter of convenience and also so we could take turns playing it around the campfire (this  has seldom, if ever, happened over the nearly 20 years we have been doing this).  Still, it was a goal and I did not achieve it.  I got distracted on another project: building a pig roasting grille and a cooler large enough to keep a whole pig on ice overnight.  Neither of these tasks was overly complicated nor challenging, but nonetheless required a requisite amount of time in the undertaking and consequently robbed poor Yoda of the attention he needed.

We bought the pig prepared from our local Amish meat shoppe.  They supplied a fresh 80 pounder, the smallest available.  They butchered her on Tuesday after Labor Day, I guess they take holidays off, too.

Piggy's heart sank as she entered the chamber, her hopes for a fair trial dashed

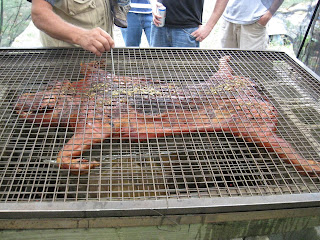
Redneck Pig cooler and Roaster.  I welded the grilles from scrap and knocked some of the rust off with a belt sander.  The cooler is leftover building materials from a church roof.
Making the "Mojo" marinade for a 12 hour soak.  Too much garlic in the recipe--10 cloves.  No vampire sightings reported
Piggy has soar muscles--nice salt rub.
Special tools for brain surgery.  Big knife and whacker.
"F R E E D O M !!!!"
A little rain calls for a canopy
Kermit didn't take it well
The usual suspects.  Was the pig a patsy? Is the real killer still at large?


Tuesday, July 6, 2010

Yoda Finishing

Well.  Its been a bit since I posted, but I have been working on Yoda.  I have it assembled except for the fretboard.  I have it stained and its a good match.  I had installed several frets, but have removed them and am starting over.  This time, I will install the fretboard and its binding, then install the frets so that the fret board is totally flat to the neck and the frets can overhang the binding properly.  I have learned that I need to pre-bend the frets and notch them around the binding, so the ones I installed are too short.  I ordered more fret wire and it came within a day--Stew-Mac is very good in this regard.

I removed the frets and sanded the fretboard smooth (again).  I filled some of the divots from the fret removal (again) with a different filler--no better than the first.  I stained it all ebony (again).  The stain did not soak into the filler (again).  I am dis-satisfied (again).

So I switched to sealing the guitar, since this has to be done before I mount the fretboard (the fretboard will have no sealer on it).  Although I think catalyzed lacquer is the right product to use, the elf at the PRO Sherwin Williams store told me that the existing finish looked like polyurethane and convinced me that  water based poly will be just as good if not better than lacquer, and I wont have to worry about compatibility. 

So I bought the product he recommended.  I got a new gravity feed spray gun from the China Depot and set about the process.  I was very careful to read everything I could about the product.  I found nothing specific about its spray-ability, but the SW elf assured me it is spray-able.  I set up a test board and spent a considerable amount of time adjusting to get what I imagined was the best spray pattern.  I had read several articles about spraying, but never actually did it, so I wasn't sure what I was looking for.  I talked to some people who had what they considered to be great success with far less fussiness than I was investing, so I expected stellar results.  Finally, though with some trepidation, I hung the guitar from my garage door track with a piece of ought copper ground wire through one of the tuner peg holes.  And I sprayed.

It did not go well.  There was a lot of orange peel.  A lot.  I hoped it would flow out, but it wasn't flowing.  I didn't know what to do.  Using gambler's logic, I sprayed more, hoping that more material would increase the flow.  It did.  I now had very substantial runs.  And orange peel.  I stopped and waited about 2 hours for it to dry.  While I was waiting, I went to Lowes and bought some 220 and 400 grit sandpaper.  And I then sanded the entire thing by hand.  This removed a lot of the urethane, and some stain.  It was getting ugly.

Note:  I, like many others, have always assumed that sandpaper, like metal files, lasted far longer than it actually does.  The 3M sandpaper I bought surprised the Hell out of me.  Even at 220 grit, I found it too aggressive for this stage.  My experience with sandpaper in the past has not yielded this type of cutting power.  I don't know if its the 3M brand or what, but it is impressive.

I re-stained the bare spots and got what I thought was a decent blend, but not as good as the original job.  After waiting for it to dry (it was about 88 degrees in the shop, but the humidity was only about 55%) and reading some more, I set up to spray the urethane again.  Based on an article in Fine Woodworking, I cut the urethane first 10%, then 20% to get it to thin so it would atomize better.  I had already tried upping the pressure to nearly 50PSI to get atomization, which by all accounts is the outer limits for a gravity feed gun.   I fussed with everything I could think of for about a half hour, then decided to spray it laying down this time (the guitar, not me).  It was horrible.  With more faulty logic, I decided to try to "save" it by brushing out the orange peel and adding urethane by hand.  I now had brush strokes you could loose a jeep in.  The stuff would not flow.

At this point, I don't know what the problem is.  It could be the cheap spray gun, though I doubt it--there is not a lot that could malfunction and it does actually spray.  It could be the product just being inappropriate for this application--I was not enthusiastic about it in the first place.  It could be my inexperience with the application and the product, though all indications are that inexperience leads to extra work, not total failure.  I'm not yet sure what I'm going to do, but one thing is clear--I will have to sand the entire thing down to bare wood and start over again at this point.  Dammit.

Monday, June 7, 2010

Push Me Pull You

When I was cleaning out my shop to make room for the lathe, which involved new tool chests, rearranging tools in the tool chests, and reorganizing all the drawers in the garage shop, I purged a lot of hardware that has been traveling with me for a decade or more.  I actually had a box of cobbler tacks, among various other small lots of stray nails, screws, and old cabinet hinges, etc.

I threw away the old iron that didn't work but I was going to fix someday in order to wax my skis--the same skis that are now the bottom half of a sled for my kids and probably won't need wax.  Gone is my collection of circular saw blades that came off the saw because they were dull, but are resharpen-able (for about twice the cost of a new blade).  No more is my galvanized steel bucket full of pole barn nails, salvaged from a chicken-coop/shed in the back yard of a house I lived in 15 years ago.  My buddies and I had a grand time burning down that shed along with the original outhouse one thirsty autumn afternoon.  The knee pads with a broken strap that I paid $5 for at the China Depot--gone.  The glue-encrusted rubber gloves, grimy dust mask, welding goggles, dog leash, and cut-off ends of several baseball bats--mere memories.  I could not bring myself to discard the winter gloves that I have had since 1984, though; they are still reasonably intact and fit, so I put them under the seat of my truck for emergency use.

When I came across the Quick grip hold down clamps, I had a dilemma: I never have enough clamps, and here were two that I have been moving around for many years, never having been used because they are meant to be installed in the top of a workbench and have only one side--the other end being the work top surface.  They require a hole to be drilled the your work bench top and are fairly immovable once installed.  Just never found a good home for them.  But how could I throw out a pair of clamps?  The solution:  I welded them together.  Already they have proven to be useful in a variety of situations that I could not have envisioned.  I wonder what other stuff I threw out that I could have found a use for eventually?  Dammit.

Yoda, at Last

Saturday was sucked up by the hitch adapter, mowing the lawn, and the heat/humidity being just ridiculous.  But Sunday was a beautiful day to spend in the garage-shop and Yoda beckoned.  I got consensus from the family that we would think about God while we proceeded with our day instead of spending a couple hours visiting with his flock.  So I got an early start, read the paper, had some breakfast with the family, sent a letter to congress [read: shat], and was hard at "work"  before 9AM.  What a great start.

I had already glued the two mahogany blanks into one piece for the back, so I was ready to cut the back into the dreadnought shape and inlay the back strip.  I had also previously made an MDF template from the original damaged back, so it was simply a matter of setting up a piloted flush cut bit in the router table, double stick taping the template to the new back, and routing it out.  Just to be safe, I ran a test piece from a leftover cabinet back panel and it worked perfectly.  I was a little concerned because I had cut the template free hand with a jig saw then sanded it down to shape with a drum sander in the drill press.  This actually yielded a good result, but there were very slight variations in the surface that I was concerned would telegraph into the finished piece.  Fortunately, this did not happen on the test piece, so I went ahead and cut the actual back.

Next, I used a jig that I had previously made to guide the router for cutting dadoes to set up the back strip inlay.  I had also used this jig as a clamping cawl when I glued the back blanks together.  The back strip was 11/64" wide and all I had that small was an 1/8" bit, so I would have to make the groove in two passes.  I set up the groove to be 1/16" deep, as the back was roughly 1/8" thick.  Although this operation was rife with opportunities to ruin the most expensive part of this endeavor, amazingly, it went smoothly.  I taped off either side of the groove so that I didn't get glue on the adjacent back which would cause it to not accept stain, and then glued in the back strip.  Of course the back strip was about 1/16" proud of the back, so I planed it down to about 1/32 to sand down the rest of the way.  And of course, I managed to take a gouge out of the back with the plane.  And there you go.  The last time I ground the plane iron with my half-assed grinder, I managed to get the iron bevel skewed so that it is no longer straight and cannot be made parallel to the sole. Building a better tool grinder will undoubtedly be my next distraction.  I was able to fill the gouge and this will require some delicate sanding, but it is not unfix-able--just irritating.

The next step was to glue the bracing to the inside of the back.  I had salvaged the bracing from the original, so the arch would be formed by the arch carved into the original braces.  This did present a glue-up puzzle, though.  I am sometimes asked by well-wishers what I would like as a gift for a birthday, or Christmas, or Father's day.  I always reply that I wish for nothing.  But when pressed, I usually say "clamps".  I just never seem to have enough clamps.  You can see from the picture that I had to improvise with various cawls to try to get uniform clamping pressure across the braces in order to form the arch into the back.  But in the end, it worked out OK.

While the glue was setting on the back, I worked on the fretboard and head stock.  I had filled all the dings and divots in the fretboard and neck and had everything pretty much sanded down.  The wood filler I am using is a little pink and it looked really pink against the rosewood fretboard, but I'm hoping it will stain OK.    I cut a piece of cherry veneer from some scrap and planed it down to 1/8".  With it double stick taped to the headstock, I routed it to shape, then drilled, reamed to 1 degree taper, and lapped the tuner holes.  This was probably overkill, but they are nice looking holes (and what else would I do with a 1 degree reamer and a box of lapping tools).  In order to rout the access hole for the truss rod accurately, I clamped the headstock into the mill vise using tapered maple blocks that I made last week for my bench vise in order to clamp the neck for sanding.  This worked out reasonably well and I was able to have good control of the cut with the mill.  This will be covered by the original tortoise shell plastic plate, but the hole still had to look precise in case anybody ever adjusted the rod and got a look at the hole.  The cherry is going to stain up and look very nice, though oddly similar to the original paper veneer that I had removed.  I might end up doing an inlay or something to set it apart.  We'll see how the rest of the project goes.

The back turned out pretty nice, though its a shame about the gouge.  It won't be detectable, but I hate that it happened.  That hand plane has always bothered me--I really need to get the iron straightened out and get more comfortable with it.  You can see in the picture where I still have some more sanding to do.  Dammit. Shame on me for using a hand tool.  I am very pleased with the grain pattern that we lucked into.  Its almost a shame to put such a nice piece of wood on such an ill-fated instrument.  Oh well, luck of the draw.

Preparing to install the top next weekend, I cleaned up all the machine tuners and the pickup for re-installation.  They cleaned up well enough, but still pretty dinged up.  I soldered a new input jack to the pickup and then installed them, only to find that the jack was not deep enough to fit through the repaired hole.  I had installed a thin veneer piece to the inside of the blown out hole and the made a nice round plate for the exterior side in order to reinforce the area against the trauma of plugging/unplugging.  The threaded end of the jack is not long enough to extend through even the original wood, let alone the two additional pieces.  So I guess a trip to Radio Shack is in my future.  Sadly, my local Shack is in a strip center next to a restaurant that apparently barbecues road kill in a secret fermented horse urine sauce.  At least that's what it smells like.  But I just can't justify a trip to Mendelson's for a simple $2 item.  Maybe the hardware store will have one.....

Anyhow, next week, I should be installing the back and working on installing frets and maybe setting the neck.  It's getting closer.

Dirtbike Carrier Unit Adapter

Although I was eager to get to work on Yoda, I had a chore to do first this weekend.  I have made a verbal agreement to sell my dirtbike with the Carrier Rack Unit I made last spring; but, the guy has a woosy hitch--1-1/4" receiver instead of the standard 2" that the unit was designed for.  So I spent Saturday morning at the scrap yard and found a 3" round tube and a 1-1/4" solid steel bar to make an adapter.  This set up will actually work better than my original design, with the tube fitting inside the tube on the CRU instead of the square tube extender I use with with the larger receiver. 

Thursday, June 3, 2010

Its Alive!

Who doesn't love a 3 day weekend, even when you have house guests.  If you ignore them, you can get a lot accomplished.  With the wife and kids running interference, I was able to sequester myself in the garage-shop several hours at a time, and Voila!, I solved the mystery of the government [read: non-working] lathe.

Because the mill was working, I believed that the switch configuration was correct.  So I had 3 phase power going at least to the end of the wires at the lathe.  My concern was that there were only 3 wires coming from the motor and one of them was green, suggesting single phase 220V with a ground.  But the motor plate clearly said 3 phase.  Further obfuscating things was the directional switch--reverse-off-forward--that was wired in the connection box  to the motor with all black wire.  But when I took the cover off the switch, I could see clearly that it was a 3 pole switch, which made the connections somewhat irrelevant except in making the reverse position actually run the motor in reverse and vice-versa, but this was only a matter of rearranging the wires after I got the lathe running, if necessary.  My next step was to look at the wiring at the motor. 

While removing the side access panel, I admired the craftsmanship that went into building the machine, down to the point of tapping the housing for the machine screws that hold the access panel in place instead of using nut and bolt.  With the panel removed and a good light, I was able to get a better look at the motor plate, which offered the critical clue as to why the motor was not running.  This is a dual voltage motor--208/220--460V.  It dawned on me that the school from which the lathe came was probably set up for 460V, so the motor was probably wired for that configuration.  All that remained was to rewire the motor for 220V (220--221, whatever it takes). 


When I removed the wire access panel on the motor, I was relieved to find the wiring diagram printed on the inside for both voltages and all the brass wire identification tags were still intact on the wire leads, so it was simply connect the dots. Once I had the motor re-wired, I fired it up and it ran perfectly.  My variable drive does work for adjusting the spindle speed, except that at too low RPM, the spindle won't turn at all. I was a little concerned that there was no ground wire, but I bonded the case to the metal conduit I have run continuously back to the sub panel, so short of running a separate conductor (which is over kill and would be a PITA), that will have to be sufficient.  But all in all, the system works as intended and I was up and running early Saturday, leaving some time to get back to work on Yoda.


Monday, May 24, 2010

Completed Switch

I went back to Mendelson's early Saturday morning, sheepishly, hoping to get in and out of there without encountering my new nemesis "Big Elf".  My goal was to acquire another switch in order to disassemble it and use the cam I needed to make my original switch work.  Simple.  But while I was there, I decided that I would add 2 pilot lights to indicate which circuit was active--the Mill or the Lathe.  Naturally, there was no complete light to be found, so I had to Frankenstein some stuff together.  This necessitated an hour of sorting through racks of random parts looking for the combination of size, voltage, lamp, and lens that would work together.    I did manage to assemble 2 lights for $2.50 each, so it was worth it.  The switch I needed was right were I had left it--with 3 other switches.  I was tempted to buy them all, but I have enough "maybe I'll need this some day" and realizing that the budget has been blown on this switch many times over, I opted out.

I did note that the other switches were 3 position instead of the 5 position I was using, so this was a bonus--I planned to use the 3 position switch head from the new switch with the circuit modules from the switch I had at home.  I proceeded to the check out pile...and there he was.  It was like he was lying in wait for me.  "Big Elf" wasted no time in snarking to me "I guess the price wasn't so bad after all."  Resisting the urge to purge, I simply replied that I needed this one to make the other one work.  We completed our transaction and I was off.

I had decided to fill some of the holes in the motor starter box that I was re-purposing for the switch.  I had picked up a can of Bondo earlier in the week.  Never having worked with the stuff personally, I decided to start there so that I could get the box repaired and repainted with some dry time while I was building the switch.  The smell of Bondo was instantly familiar, though I'm not sure why--Dad was not a big fan of the stuff.  Remembering that I had hated that smell, it was strangely comforting now--something akin to "your own shit don't stink".  It took a few tries for me to get the holes filled to my satisfaction.  Finally deciding that I was taking too much time with this, I put a coat of paint on and set it aside to dry while I worked on the switch.

Once I got the switch apart, I realized that the cams in the two switches were not the same and I would not be able to simply take a cam from the new and add it to the old to get the "dead" position I needed.  Moreover, the 3 position head and the 5 position head worked in tandem with their respective cam designs, so it at first looked like I was not going to be able to get a working combination.  Ultimately, I found that the head and 2 cams from the new switch installed on the circuits of the old switch gave me everything I needed except...one cam.  So I was back where I started except that I now had a 3 position switch head and would not have to manually bi-pass 2 "dead" positions.  Looking at the cams I had leftover, I realized that I had 2 cams with only 1 detente and I needed 1 cam with 2 detentes.  So I had 2 tries to make the cam I needed. 

This would, of course, be a perfect job for the Mill.  I felt that temporarily wiring up the VFD and the Mill to do this job was a bit excessive (you have to draw the line somewhere), so I resorted to caveman technology, sort of.  I fitted the cam I needed to copy to the cam I was cutting together as they normally mate and chucked the unit into my vise.  These are nylon cams, so cutting the material could be achieved in a variety of ways.  I chose a copping saw.  I was able to rest the blade against the pattern cam and follow its profile as I cut the new cam.  It worked reasonably well, leaving only a little fine tuning to be done with the Dremel tool (actually a China Depot knock-off of a Dremel tool--when will I learn) with an engraving bit.  My first attempt worked, so I have a spare if I need it.

I got the switch all together and it worked well, so I was ready to assemble the box.  Looking at the now dry box, I decided that it needed another coat of paint. Naturally, this resulted in a mess.  For some reason, the fresh paint crackled slightly.  I had been very careful to keep contaminates away from the box as it dried and even wiped it with mineral spirits before I painted...oops.  I guess the mineral spirits prevented adhesion.  So I had to wait for it to dry, sand it down again, and start over.  Meanwhile, I went ahead and pulled wire in the conduit I had run last weekend.  And this meant that I would soon discover that I had not bought enough wire, so a trip to Lowes.  By the time I got back, the paint was dry, so I sanded it again and repainted it again.  The finish was not what I had hoped for, but it was good enough.  I pulled the wire and then while I waited for the paint to dry, started rearranging tools from the old tool chest to the new tool chest that I bought at the garage sale from the old retired machinist from whom I also bought some tooling --did I mention that?  Anyway, I will end up with a tool chest for machining and a tool chest for my general tools.

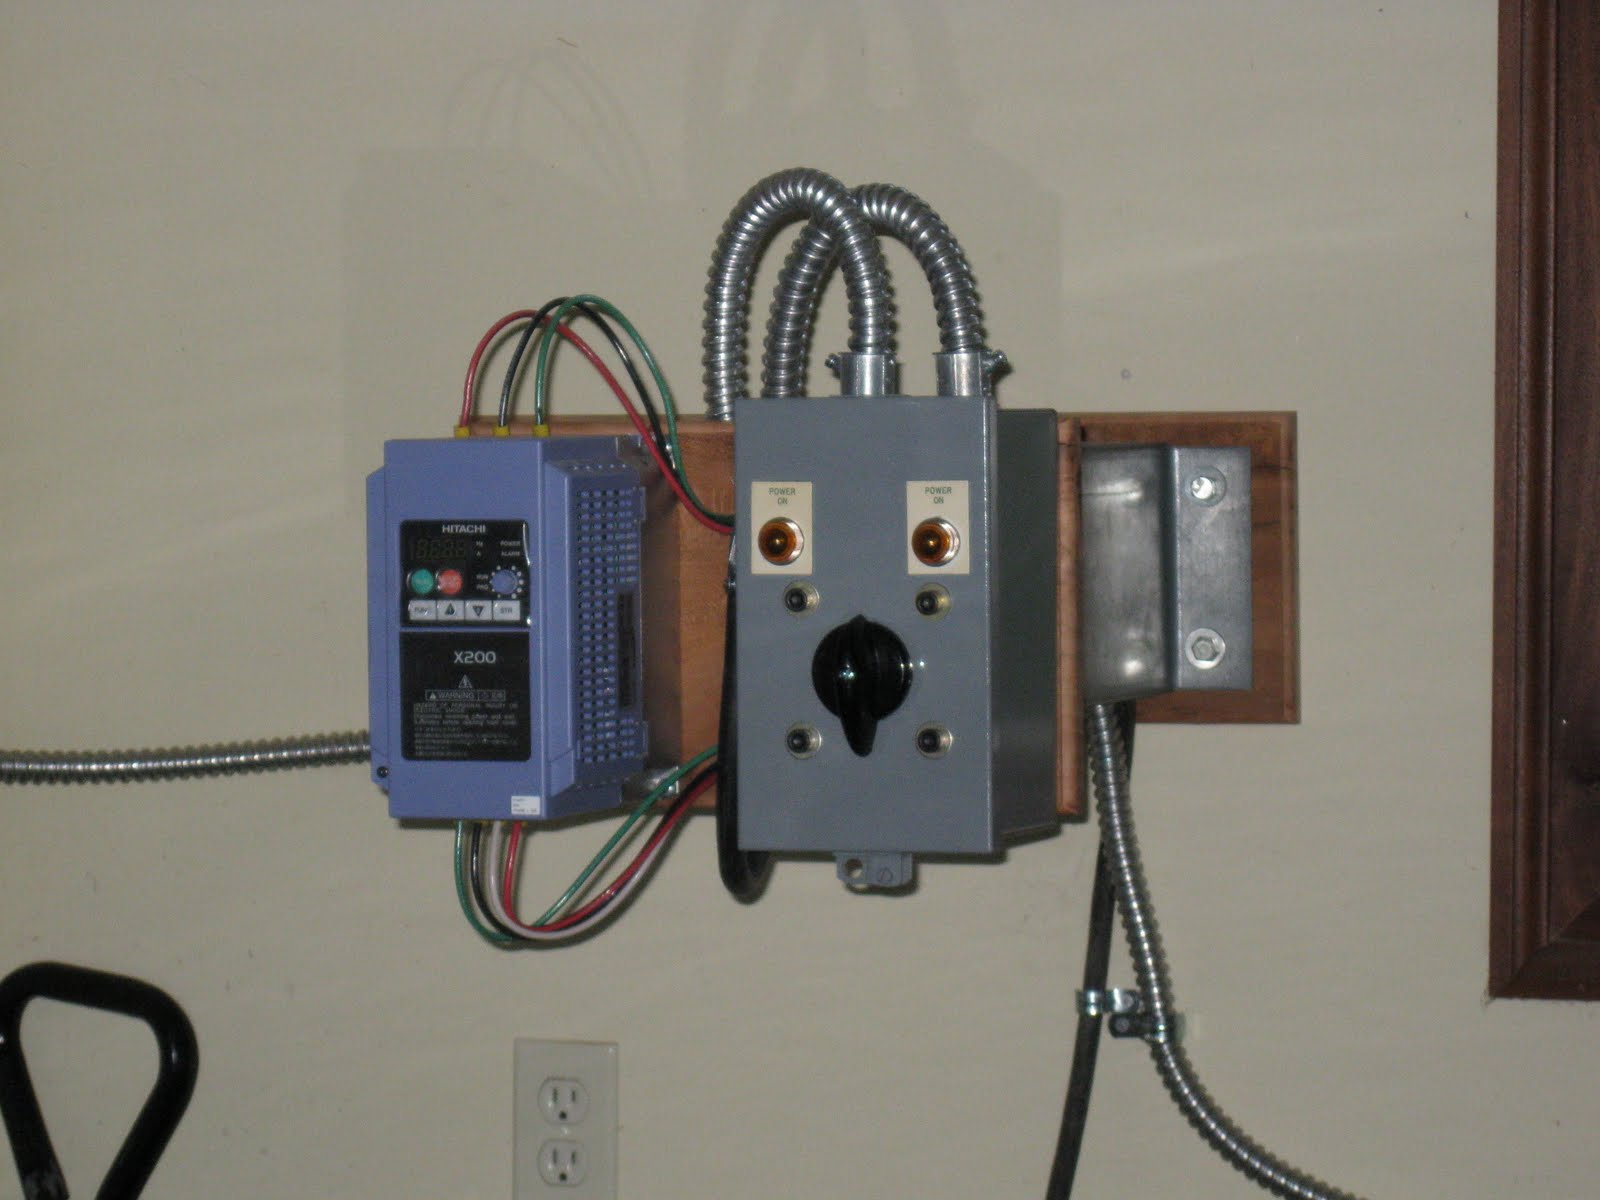
When the paint was dry a third (or fourth, I lost track) time, I assembled the switch and the pilot lights and wired it up.  It went together pretty easily (that may not be accurate since this is day 5 on this thing).  I did have to change a dedicated ground to a common in order to make the pilot lights work appropriately, so I am using a shared ground for the Mill, Lathe, and Compressor.  Not sure if this is Code Kosher, but it works for now (I'll read up on that later).  The switch worked fantastically and the Mill is back in business.  The Lathe, on the other hand, did not work.  I'm certain that the circuit from the switch is correct, since the Mill works.  The wiring on the Lathe is highly suspect and the motor might be bad.  If I have to buy another motor, I could just buy single phase and this whole switch thing will have been for naught.  I didn't have time to figure out the problem, so that will be next week's adventure.

Wednesday, May 19, 2010

Switch Update

I got the distributor for the switch on the phone and he is going to try to scrounge up a cam for me.  I asked him, out of curiosity, what a new switch would cost: $770.00.

I've decided that $15.00 maybe wasn't such a bad deal.  I'm going back to Mendelson's to buy the other 4 that were on the shelf, new in the box.  I'll be selling for $100.00 each, if anyone is interested.

Control Panel

This weekend I worked on the control panel for the mill and lathe.  The challenge has been to find a 3 pole, 3 throw switch (tptt).  Initially I was looking for a simple disconnect, but I had no luck finding such an animal, concluding that a selector switch was my only option.  Not being too familiar with controls, it has been learning experience for sure.  Most of the web sites I found offered catalog descriptions and were not helpful in describing applications.  My other problem was a constant in all my little projects: limited willingness to part with money.  This drove me to the very lair of the enemy: Mendelson's Surplus.  I mention them by name now (formerly I refrained) because they managed to piss me off again.  A surly attitude from one of the elves who apparently has been knighted within the organization--or whatever elves do to elevate their status--had me steaming as I left the building.  I have sworn them off before and gone many years without darkening their door, but the gravitational pull is hard to resist; sometimes I can feel it tugging at me from my shop--like when I'm in a quandary about how to make something work without spending too much money on new parts, not knowing if they will serve my intentions.  The issue this time relates to the outrageous pricing.  After spending literally hours sorting through piles of junk that has sat in heaps for decades, I tried to get a price quote from the elf, who decided to do an online search to find the retail price. I mentioned that I had bought a similar item from them last week for $7.50 (a switch that I disassembled and probably would have worked had I not lost patience trying to fit all the little springs and cams back together after locating them from the various corners of the shop where they ultimately landed after bouncing around like ricochets in a cowboy movie), and that I wasn't particularly interested in the retail price of this ancient switch.  Having invested my own time in finding it, and realizing that I may be the only person the universe who could actually find a use for it and who was willing to look for it, I felt that about $10.00 was fair.  Well, you would think that I had just insulted his mother.  He mentioned that he didn't know what it was worth, but he was sure it was worth more than $10.00.  I explained that it was only worth as much as someone was willing to pay for it, and that I was willing to pay $10.00.  I asked if he would rather have $10.00, or a useless switch buried on a shelf for another decade.  He replied that he would just put it back on the shelf "because I can".  I resisted the urge to just walk away (as a younger man, I would have let loose a verbal assault intent on making him cry, but I've grown...), because I really needed the switch in order to keep working over the weekend.  We settled on $15.00.  I mentioned that I had been a customer since the 1980s and had never been treated so poorly.  I'm not sure what he said to my back as I was walking away.

So, I got home with the switch and immediately took it apart.  This is a nice big switch, so the springs and cams are a manageable size.  I gave myself a pretty good headache trying to work out the functions to do what I needed, and re-assembled and dis-assembled the switch a few times before I got it to where I think it will work.  It is not ideal--I have a dead position that powers one line and I need a specific cam to open the pole.  If I bought another switch, I would have the cam I need, but I don't want to spend another $20 and I don't want to go back to Mendelson's. 

I found the manufacturer and a distributor in New Jersey.  Turns out, these switches are made for marine shore power and generator switching, which is essentially the function I need.  I can probably buy a new switch that does exactly what I need, but I'm guessing that a new switch like this is a $100 item.  I did send an e-mail to the distributer inquiring if I could acquire just the cam I need.  Waiting on a reply.

Thursday, May 13, 2010

Driving Instructions, Part I

Ok, here is lesson one of an infinite series of specific driving tips and techniques for the average driver [read: moron].  The illustration applies not only to making right hand turns, but also to parking on a curve.  The object of this lesson is to learn how not to "curb" your vehicle, and more importantly, how not to ruin someone else's lawn.

It is apparently a little known fact that a wet lawn, as they often are in the spring of the year, is soft.  A typical vehicle weighs in the neighborhood of 4,000 pounds.  All of that weight is resting on 4 wheels with a contact area in the neighborhood of 133 square inches (trust me, I researched this); thus, a point load of 30 pounds per square inch.  Typical soil bearing capacity when dry is 2,000 pounds per square foot, or 14 pounds per square inch.  This is significantly reduced when soils are wet, but soils do vary greatly, so they could have more capacity   To be conservative, we'll just use 14 psi.  You can see that a car exerts nearly double the load of the soil's bearing capacity.  The end result is a rut.  In someone's lawn.

Although some people don't care about their lawn, it is safe to assume that many people do.  And, those people would prefer that a car stay off of the lawn so that said ruts do not appear.  There are many reasons that ruts in a lawn are undesirable, but for this discussion, we'll just take it as a given.


If the illustration seems confusing, take a minute to examine the one viable route.  The logical conclusion is that the nose of the car needs to progress further in a straight line before the turn is initiated to ensure that the rear wheels follow on the pavement and not over the adjacent lawn or curb.


This may take some practice, but once ingrained into your driving habits, it's no trouble at all.  Besides, think of how otherwise inconvenient it would be to have to get a new windshield when some angry homeowner comes storming out of his garage with a baseball bat and starts beating on your car and shouting obscenities about how you ruined his lawn.

Monday, May 10, 2010

Rearranging the Shop

I spent most of the weekend moving machines around to find space for the Southbend lathe.  I gave up my workbench site by the window so the lathe would be next to the mill, facilitating the 3 phase power requirement.

I liberated the bench and cabinets that had been the home of various planting implements and lawn chemicals for my new workbench.  Ultimately, this is going to work much better, as I can get the gardening stuff all together in the large mobile cabinet that already has fuels, chainsaws, shovels, and other unpleasantries.  I built this cabinet to be somewhat fireproof, having made it from steel panels, unistrut, and fire rated doors left over from a construction project.  I don't imagine my insurance agent would approve storing fertilizers and accelerants together, but having them at least in a semi-resistant cabinet is probably better than in most households.

I still need to add some shelving above the workbench, so I can add a work light below and have space to store projects in-process (because I tend to get side tracked, if you haven't noticed).  The lamp I spent a bit of time working on (haven't posted anything on this yet), and put aside because I didn't like the way it was turning out, eventually needs to be finished; I am not ready to re-purpose the cherry wood, which I spent quite a bit of time milling down from rough lumber for which I traded a pretty nice Delta compound miter-saw.  So, I have a pile of parts that need a temporary home and I suspect that even when the lamp is finished, there will always be something in que.  Even Yoda needs a place to rest between my attacks.

Next on the agenda is to wire up the lathe, then get back to Yoda.  I fab'd a bracket to mount to the wall and extend out 24" as a mounting post for the VFD and the disconnect for the mill and lathe.  This will put the VFD in arms reach of both machines, which is much more handy than mounted flat on the wall next to the mill (where I had it originally).  Reason being that I can use the VFD to control motor speed of both machines without messing with belts and gearing.  You can see the bracket mounted in the first picture.  But the VFD cannot run both machines simultaneously, so as a precaution, I have been searching for, and I think I have found, a 3 pole, 3 position switch, so I can select either machine with only one powered at any given time, but both powered from the VFD.  I bought more wire and some AC conduit (and made it out of Lowes for under 50 bucks--Woohoo!) to make the connections and I am eager to get this done.  But I ran out of time this weekend, so it will probably be next weekend before I get to it.

Thursday, April 29, 2010

Southbend Lathe

I went to a school auction yesterday and scored a Southbend metal lathe.  I haven't had time to mess with it yet, or even research it, but it is a good size for my garage shop and what I've read on-line suggests that the old Southbend lathes are a good bet with parts generally available and heavy construction that lends to long life.  Having been in a school, I'm sure it has been abused; the rails look pretty dinged up.  But since I'm not going to be trying to make anything with close tolerance, it should be good for general purpose. 

Obviously, it has a 3 phase motor.  But since I am already using a variable frequency drive on my 3 phase vertical mill, I'm thinking I will be able to run the lathe off the same drive and not have to buy another one.  I just wont be able to run them simultaneously.  I'll probably wire in a disconnect so that its not possible to accidently have them both in the "on" position at the same time.

Moving this dude presented the same problems as with the Mill; it is one heavy SOB.  They loved iron back then.  I could budge the tail stock end manually, but not the gear end.  Also, I had to get it out by 5PM.  By the time I got back to my office to get a stakebed and some tools, and back to the school (30 min. drive each way) it was 4PM.  The guys in charge were school system employees, so you can bet there was no assistance available and they would be locking the doors at 4:50.

At home, I quickly removed my machine mover from the mill in my shop.  This involved putting it up on temporary blocks.  Sounds easy?  Not.  I had to plane some oak cribbing to the exact thickness of the gap between the rails of the mover and the slab, then wedge them in and unbolt the mover and pull out the rails (see earlier post for pictures).  I grabbed some wood cribbing and a spud bar, and was off to the school.  The lift gate on my stakebed--a gift from God himself--is good for 1,750 lbs.  It barely worked for the mill, but the lathe looked to be a lot less heavy. 

Back at the school with the clock running, I worked frantically and got my wheel rails lined up and the cross rails in place to bolt together under the lathe once I got it up on blocks.  The details of this effort are hard to describe.  I used the spud bar as a lever and the wood cribbing for both a fulcrum and to block the corners up a little at a time, being careful to not interfere with placement of the rails which would have to slide in around the base.  Suffice to say that I was able to get this thing out the door as they were turning the key in the locks behind me.  Fortunately it was a beautiful day and breezy, so my sweat drenched clothes dried out a bit on the drive home.  I sat down to dinner at 6:30 with the family, the lathe in my garage and the stakebed parked back at the office.

I work alone quite a bit, and one learns tricks and techniques along the way.  Most importantly, never forget your good friend Archi Medes.  Good old Archi will lift you up and only let you down easy.

Monday, April 26, 2010

Yoda

I finally got around to taking a closer look at the Alvarez guitar my friend gave me to take a "crack" at repairing.  Several weeks ago, I began to disassemble what was left to disassemble.  I took off the strings, which were the only thing holding the neck and body together.  I tried to compare the low E to a piece of field fence I dug up out of the back yard, but without a microscope I couldn't make any claims for certain.  The neck was broken off the body through the heel, so I planned to remove the rest of the heel from the dovetail and glue it back together.  I stripped the hardware off the neck to clean it up.  I used mineral spirits to try to get years of grime off the fretboard--this thing has been sitting in a garage for a long time.  I ended up taking a chisel to the fretboard to scrape across the grain against each fret.  This was not a great idea and yielded poor results.

So this weekend, I decided I would re-fret the thing, since the top three frets were badly grooved.  The fret board itself is also worn in the top three frets--from long fingernails I guess.  So I removed all of the frets and sanded the entire neck to original wood--it looks much better already.  I removed the fake wood headstock cover--it was very disappointing--actual paper printed with fake wood grain and the logo--no inlay at all. I'll make a new real wood cover.  I removed the plastic binding and the plastic nut so I can profile the neck properly.  I thought about sanding the grooves out, but that would take too much material off.  I could just replace the fretboard at this point, but I think I want to keep as much of the original parts as possible; and, not tie too much money into this thing. I will fill the divots with epoxy filler, which should blend well enough.  I plan to replace the nut with bone, just for fun.  I'll make it from a piece of cow bone--I think I may have a chew toy laying around somewhere from my dear old departed canine.  It should machine like wood.

I removed the neck heel from the dovetail by heating it with a heat gun and using a bar clamp to "press" it out of the joint.  This was a bit tenuous as it involved a lot of heat and pressure, both of which threatened to reduce the parts of this instrument to ash and splinters.  Ultimately, it popped out nicely and I learned that removing a dovetail neck is not too big a deal.  I glued the heel back together with the neck and I expect the neck will go back together with the body with minimal trouble.

Now for the major damage.  The cracked back looked like I may be able to press the crack back together and glue it up.  I made a clamping block and got most of the crack to fit back together, but I just wasn't satisfied that this was going to be adequate.  I decided to replace the entire back.  It came apart with a fair amount of effort and patience.  Unbelievably, of all the tooling at my disposal, a cheap pocket knife worked the best.  Although the binding will have to be replaced as well, as it melted from the heat gun and was severely damage by the pocket knife, the sides are very serviceable and I expect no trouble mating a new back and re-binding.  I would like to make new wood binding, but since I am not re-binding the entire guitar, I will have to match the existing white plastic on the front.  There is real danger of making a silk purse from a sow's ear.

So now I have the thing disassembled and ready for new parts and re-finishing and re-assembly.  This week I will acquire the new fret wire and decide if I'm going to buy blanks for the back or make the back from lumber I have laying around. I am trying to keep the front completely untouched.  It is the essence of "character" and if it were mine, I would want it untouched.  I will clean it up a little, because I simply can't stand the grime.  The pickup should be easy to fix--it just needs to be cleaned and re-soldered to a new PL55 jack.

I'm looking forward to finishing this thing.  I'm particularly interested in seeing how the glue holds up on the neck.

Sunday, February 21, 2010

Guitar Gyro

A friend of mine played for years on the local rock band circuit.  At some point in a performance to which  I was not witness, he apparently channeled Pete Townsend and the result was that his well worn Alvarez guitar received new ventilation in its back.  I had briefly seen the guitar before the incident and, for some reason, I recalled that this was a "Yairi" model, meaning that it was a high-end instrument, hand-made in a sequestered village shop in the mountains of Japan.  Yes--a Japanese Master named Yairi in a small village workshop--the stuff of movies.

Although the band since disbanded, I had recently heard that my friend was thinking of returning to the scene (music scene, not crime scene), and it made me think of the ill-fated instrument.  Not having seen it since its brush with death, I did not know the extent of the damage.  But I figured that rather than let it languish in his garage and eventually get  thrown away, it might be worth a try for me to at least dissect it and learn a little about lutherie, with the possible outcome of resurrecting the instrument.  After all, if it was a Yairi, the woods alone were undoubtedly worth trying to salvage.


Well, I got my hands on the poor thing yesterday.  Clearly, my friend had not been playing Guitar Gyro, but Guitar Grinder.  I did not expect to receive it in two pieces, one of which has a nice rattle when you shake it.  This should be quite a challenge.

Since I made no promises regarding actual success in repairing this thing, or a time-line, I'm under no pressure.  And, it turns out, to the best of my internet research enhanced knowledge, it is not a Yairi.  But I must admit that I am nonetheless both excited to get started, and baffled as to where to begin.  This should be fun.